NES Chiptunes in Unlock Everything
The soundtrack for Unlock Everything consists of chiptune tracks in the style of the original NES. Here's a sample track so you know what it sounds like:
This is the music for the second level of the game, titled "Face Your Destiny", and is my personal favorite out of the entire OST. In this writeup we'll be dissecting the different components of this track to see how it all comes together, as well as discussing some arrangement techniques involved in each section.
Before I go into the actual sounds used in the track, I should point out that the first thing I did when starting this song was decide on a rough tempo to compose at. I settled on 150BPM for this track, because I wanted it to have a lot more energy than the music for level 1 (100BPM) but a little less than level 3 (180BPM). This would give the soundtrack a sense of progression that matched the intensity of the gameplay.
2A03 Channel Breakdown
While the music in Unlock Everything sounds much like authentic NES music, it wasn't produced in FamiTracker or an equivalent NES sequencer. Instead, it was actually produced in a modern DAW (FL Studio) and makes use of some additional mastering effects that aren't present in the original. It's "fakebit" in that sense. While FamiTracker is a really awesome and fun tool to work with, I'm nowhere as experienced with it, and more importantly, it takes me way more time to make anything with it when compared to FL Studio -- time that I couldn't afford to sacrifice during the middle of Ludum Dare. That said, I still tried to stay true to the arrangement limitations and instruments of the 2A03 chip, which is the sound chip used in the original NES.
The 2A03 chip as it is used in the original Mega Man games features four separate sound channels:
- Two pulse wave channels - often used for melodies and harmonies
- One triangle wave channel - often used for basslines and toms
- One noise channel - mainly used for percussion
Note: The 2A03 also has DPCM sample playback capabilities which are often used for richer percussion sounds, but this technique is entirely unused in the Mega Man soundtracks, so I won't be discussing it here.
Triangle Wave Channel
Let's start with the triangle wave channel, as it provides the bassline foundation for the track to build off of. The 2A03 chip has a distinctive aliased triangle wave waveform that gives it some extra character. Here I'm using the FT_Triangle waveform included in my FL Studio Resources pack (found here) to replicate the waveform. Here's what the first 4 bars look and sound like:
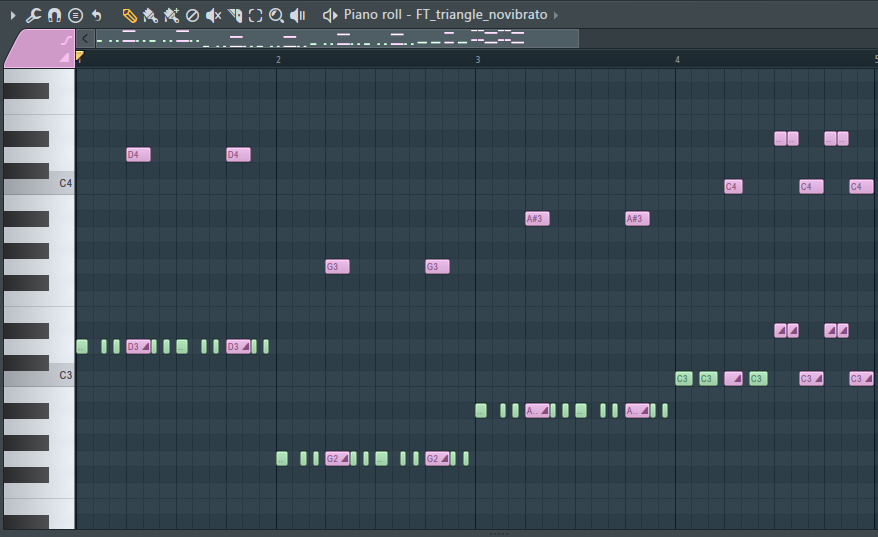
There are two different things going on here!
First, in the green notes we have a simple repeating bassline rhythm that sets up a i-iv-VI-VII (Dm-Gm-Bb-C) progression.
On every second beat, however, we have a red slide note that starts higher up and performs a downward pitch slide. This gives the note a percussive quality somewhat mimicking a drum and was a technique used here and there among the different Mega Man soundtracks. In the last measure we use this technique to add a small drum fill.
It's worth noting that this pitched triangle wave drum sound is a "characteristic" trademark of the Mega Man soundtracks, but it's actually not used on a majority of the songs in those soundtracks. It just happens to be a characteristic sound.
Noise Channel
The noise channel generates pseudo-random noise bursts at varying frequencies and volumes. Instead of synthesizing these from scratch, I used pre-recorded samples ripped directly from the Mega Man soundtracks (also included in my FL Studio Resources pack). I used these to make a basic drum loop, which looks and sound like this:
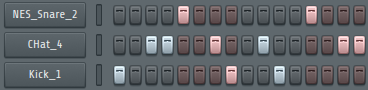
Pretty straightforward stuff here. We've got three different samples - kick, closed hi hat, and snare - and are using them to make a simple drum rhythm.
Putting together the triangle and noise channels results in this basic "skeleton" for the first section of the track:
Pulse Wave Channels
The pulse wave channels provide the most diverse and interesting sounds and can be used in many different ways. There are two of them that can work independently or together in various ways, but typically when writing for the two pulse wave channels you can do one of three possible things:
#1: Have the two channels play entirely different things. In this example we have one channel playing a lead melody while the other channel provides harmonic structure by playing short stacatto notes:
#2: Have the two channels play in harmony. In this example both channels are working together in the same style and melody, but playing different notes in harmony. There's also some interesting back-and-forth action mixed in:
#3: Have the two channels play the exact same melody, but offset them to create a special effect. Typically the second channel will play the exact same notes, but a bit later, softer, and with a small amount of detuning. This provides a unique "echoing" sound:
Notice how much flatter the sound is if we take out the second pulse channel and only have the melody playing by itself:
Of course, when you're writing actual parts, you can jump back and forth between these three different "modes" of writing for the pulse channels. Here, in the first four bars of the song, I mostly use the delay effect (#3), but in the fourth bar I have the two channels play in harmony (#2):
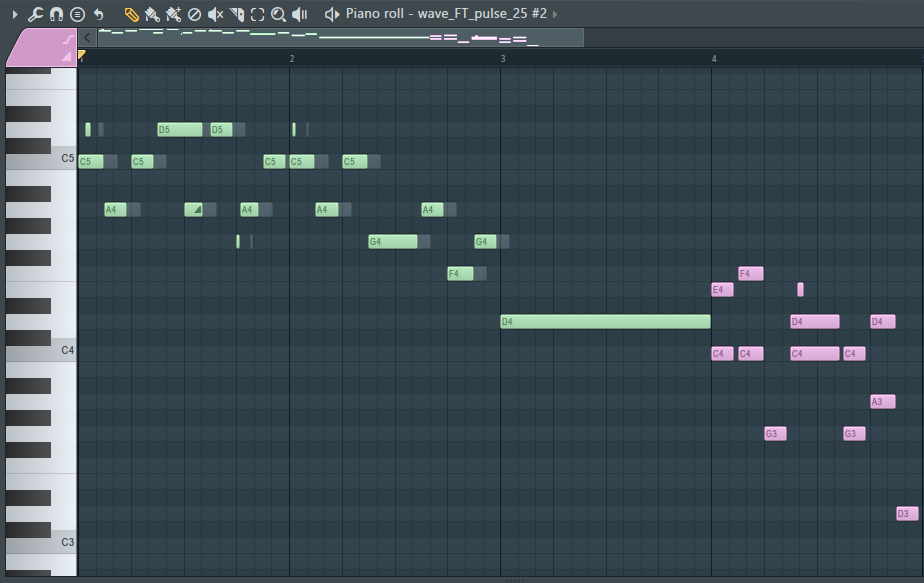
The pulse wave channels can play notes of 3 distinct timbres depending on the pulse width you assign to them (12.5%, 25%, or 50%). In this case I'm sticking with the 25% pulse wave as it's got a rich trebly sound without being too nasaly, but all three pulse widths are very unique and have their own uses.
Since the pulse wave channels are frequently the melodic focus of a track, there's often a lot of opportunities for playing around with different note articulation effects. In this particular section I've used some small grace notes/pitch slides at the beginning and end of certain notes, in addition to a pitch LFO that kicks in automatically for longer notes to give them a pitch vibrato effect. Little details like this can really give a melody a little extra spice to make them more interesting than just laying out flat notes. Compare this version without all of the articulations and embellishments to the one above:
The differences are subtle, but little details like this really help make a track that much more memorable.
Putting it all together
Putting the two pulse channels together with the triangle and noise channel "skeleton" that we built before gives us the full sound layering for the first section of the song:
Hopefully you enjoyed this deconstruction and insight into the structure of an NES-styled chiptune. Since the 2A03 soundchip has such rigid limitations, it's easy to break down a song like this into its constituent parts and see exactly how each one contributes to the whole.
If you'd like to check out the rest of the Unlock Everything soundtrack, you can do so here.
If you'd like to see what this kind of composing process looks like in real-time, below is a video recording of myself producing "Parkour Man IV OST", a collection of five Mega Man-styled chiptunes that I made in a single hour for One Hour Compo:
If you'd like to see more "Making of" videos, you can view the entire playlist of them on YouTube:
https://www.youtube.com/playlist?list=PL60CnXi9EAVEQbMlbN_KOoZMIP1gpkvzd